BIOS Replacement
What is a BIOS? (Click here for more information)
Changing your Colecovision's BIOS is NOT that hard. Why would you want to change the stock BIOS? Simple, getting thru that brutal 12 second title screen! In one way or another!
There are currently three different flavours of BIOSs available for the Colecovision. If there are others not listed please get in touch with us. The delay stands for the title screen and the options, there is no technical difference between a 8K and 32K BIOS, it's just based on the size of the chip used. Here they are...
- "No Delay" 8K BIOS (Download NTSC md5: 47f7180592a00b9631c97a12ff0fdd3c)
- "Short Delay" 8K BIOS (Download NTSC md5: 92c5c68b8dad10033494401f21f6ddf4)
- "Fire Skip" 8K BIOS (Download NTSC md5: 3a7ab6e3c623c604c549f987a6e5035b or PAL md5: 28810134c8600df1f41d4ed2df5cf8d9) - We recommend using this one!
- "Fire Skip" 32K BIOS (Download NTSC md5: 39b3c3b801b1ca0827a7a8671d21e86a or PAL md5: 2b86d6c34308a9a22979edeb33c11a4c) - We recommend using this one!
Here's what you'll need to get started.
- Some basic soldering skills
- An EPROM Programmer (We use the XGecu TL866II Plus Programmer purchased on eBay). Install the software and drivers. If you've purchased a pre-programmed EPROM skip to the instructions. If you wanna burn your own.
- UV Chip eraser, in case you mess up. If you wanna burn your own.
- A BIOS file of your choice from the list above. If you wanna burn your own.
- One M27C64A (28 pin) EPROM 8K chip or the same 32K chip used to create PCBs (The 27C256 DIP-28). With the 27C256 32K chip must create a new 32K bios file with the Windows copy command. (Example... copy /b biosfile.bin+biosfile.bin+biosfile.bin+biosfile.bin new32outfile.bin) then burn that to the 32K chip. This basically copies the same bios file four times into a new 32K file, 8K x 4 = 32K bios file. Or download the 32K ones above. Or you can use the 32K EEPROM from the cart building tutorial too. If you wanna burn your own goto the intructions.
- One (x1) 28 pin DIP style chip socket
- Some solid core wire to bridge two points on the motherboard.
- Follow the instructions below
Instructions
- Disassemble your Colecovision. You need to get to the motherboard there are a lot of Youtube videos on how to do so.
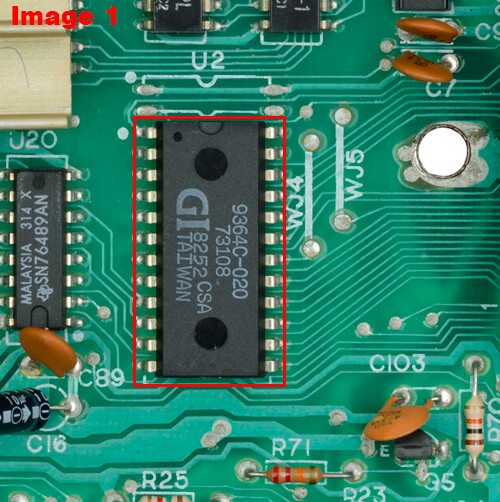
- Locate and remove the current bios chip from your console. Either by cutting the legs of the chip (non salvage) or use a solder sucker/pump. (See image 1)
- Remove the solder from all 28 holes, then solder a 28 pin socket to the motherboard, and make sure the notch is oriented properly.
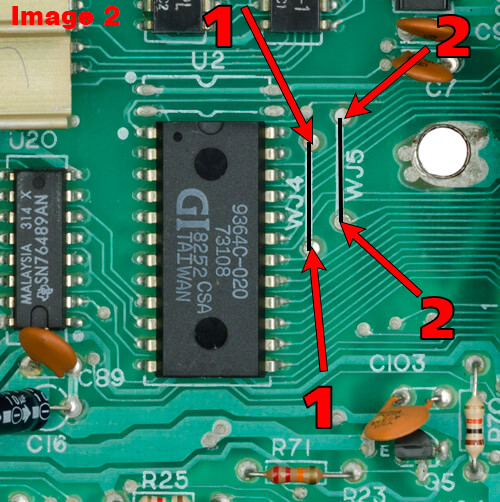
- Bridge the two vias on the top side (WJ4 & WJ5). The two points (Black lines on the image) with a short piece of wire. (See image 2)
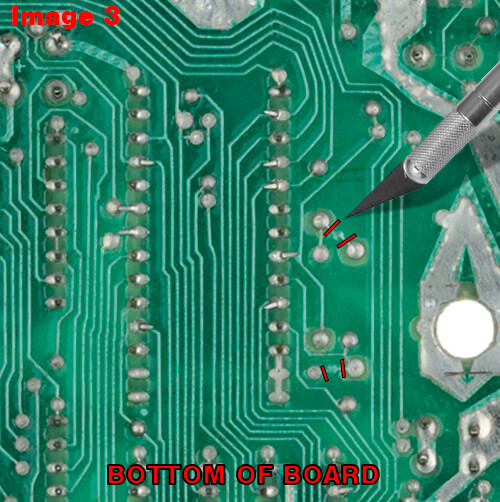
- Cut the traces on the bottom side of the motherboard with a xacto-knife. (See image 3)
- Once you are done with the above you will then need to burn the bios file to the EEPROM chip. If you already have one pre-programmed, then skip to step 9.
- If you are using the M27C64A chip (8K) to can skip to step 9.
- If you are using the M27C256 or SST27SF256-70-3C-PGE CDIP-28 chips (32K) you'll need the 32K version of the BIOS file.
- Once the BIOS file has been written to the chip you are ready to pop the chip in the socket. Again, note the orientation of the notch.
- Insert the chip into the socket, be careful to notice the right orientation, notch lining up with the notch on the silkscreen on the motherboard, then turn it on to test it!